I had a lot of fun putting this together, plus its not very much work and its a great way to reinforce our little "lessons" in a fun way that Owen loves.
The left side is a flap book, the middle just a diagram of a house, and the right side is like a big accordian. Of course, his favorite part is the yellow car. car? vroom, vroom. Car? Vroom, Vroom. Car? Vroom, Vroom. etc. etc. etc.
Showing posts with label outside. Show all posts
Saturday, November 27, 2010
Wednesday, November 24, 2010
House Fun!
Well I was thinking of playing with color today but that kind of failed miserably so we moved onto bigger and better things! We made another contact paper craft; I cut out shapes of a house, trees, sun and had Owen help put them onto the contact paper. He loves to help "pat, pat, PAT!" (if that makes no sense to you, he helps "pat" the papers down.) I had put double sided tape onto the windows and doors to get them to stick. We had a lot of fun putting the cotton snow down.
I wanted to put this up on the wall next to the house from yesterday, but knew from our experience with the red collage that Owen was going to touch it and get his fingers stuck to the page and get dog hair on it and pull off the shapes and just make a big mess. soooo... I put saran wrap on it. Weird, I know. And probably there was a better solution but that was the one I tried. So here is our saran-wrapped finished product:
Since he enjoyed muffin tin monday so much I decided to make a house-themed lunch, which I thought was pretty cute.
But Owen pretty much made a mess of it and asked for cheese crackers. Isn't that just how it goes??
We also tried putting straws into a Parmesan cheese container because, well, all the other bloggers are doing it but that was only fun for about two seconds.
Things that were more fun:
--throwing the Parmesan container
--running with the Parmesan container
--chasing the dog with the Parmesan container
--getting tiny boy fingers stuck in the holes of the Parmesan container (several times, lol).
--leaving straws all over the house
Anyway, hope you are having fun getting ready for Thanksgiving tomorrow! If I am lucky maybe we will do another fun craft. OH, and I should definitely post my MIL's sangria cranberries recipe. YUM.
I wanted to put this up on the wall next to the house from yesterday, but knew from our experience with the red collage that Owen was going to touch it and get his fingers stuck to the page and get dog hair on it and pull off the shapes and just make a big mess. soooo... I put saran wrap on it. Weird, I know. And probably there was a better solution but that was the one I tried. So here is our saran-wrapped finished product:
Since he enjoyed muffin tin monday so much I decided to make a house-themed lunch, which I thought was pretty cute.
But Owen pretty much made a mess of it and asked for cheese crackers. Isn't that just how it goes??
We also tried putting straws into a Parmesan cheese container because, well, all the other bloggers are doing it but that was only fun for about two seconds.
Things that were more fun:
--throwing the Parmesan container
--running with the Parmesan container
--chasing the dog with the Parmesan container
--getting tiny boy fingers stuck in the holes of the Parmesan container (several times, lol).
--leaving straws all over the house
Anyway, hope you are having fun getting ready for Thanksgiving tomorrow! If I am lucky maybe we will do another fun craft. OH, and I should definitely post my MIL's sangria cranberries recipe. YUM.
Labels:
14 months,
art,
fine motor skills,
muffin tin monday,
outside
Tuesday, November 23, 2010
turkey turkey!
So I decided that I had to do a hand turkey craft with Owen after seeing a blogger (ack, I don't remember who) saying they do them every year to see the hand grow. I really loved this turkey craft and decided to do it. I was shocked by how tiny Owen's hand is!!! I had planned on decorating the fingers with pompoms because we don't have feathers but the pompoms were way too big! So I cut the hair off of the pompoms and had Owen help me glue them down.
Well thats about as far as we got as a group project, he was not interested in helping, so I just got out my gluegun instead and finished it off myself. And then I made another one for Owen to play with because he sure ain't touching mine! Ha. who said crafts were for the kids?
Some other things we did today:
--these fun house activities I posted about yesterday
--we took a walk outside and down the street pointing at the other houses, trees and snow on the street. We also looked in the windows of our house. Owen definitely has house, tree and door down; window--not so much.
--since crayons really aren't that fun for Owen to color with (he's just not that good at them) I got out a pastel set and had him color a picture I drew of a house and trees. It was fun, but a warning is that pastels are pretty messy and they break when dropped. Sure are fun, though!
We hung the picture on the wall. Since I didn't have anything to "fix" the color with to prevent tiny hands from smudging it all over I took two page protectors (like from a binder) and put the picture in them. Instant frame!
Well thats about as far as we got as a group project, he was not interested in helping, so I just got out my gluegun instead and finished it off myself. And then I made another one for Owen to play with because he sure ain't touching mine! Ha. who said crafts were for the kids?
Some other things we did today:
--these fun house activities I posted about yesterday
--we took a walk outside and down the street pointing at the other houses, trees and snow on the street. We also looked in the windows of our house. Owen definitely has house, tree and door down; window--not so much.
--since crayons really aren't that fun for Owen to color with (he's just not that good at them) I got out a pastel set and had him color a picture I drew of a house and trees. It was fun, but a warning is that pastels are pretty messy and they break when dropped. Sure are fun, though!
We hung the picture on the wall. Since I didn't have anything to "fix" the color with to prevent tiny hands from smudging it all over I took two page protectors (like from a binder) and put the picture in them. Instant frame!
Sunday, November 21, 2010
One box, many uses
This week's theme is "out the window" because I suspect there are a few things out there that Owen doesn't know the name of (have we ever talked about trees? Does he know the name of a house?). I made three fun projects out of a moving box and am pretty excited about them.
The first was this peekaboo house. I got the idea from this post at I Can Teach My Child. It was fun and easy to make (although if you make it, make sure to put the pictures down before you put on the windows... so hard the other way!)
Inside the windows are pictures of his grandparents and his parents. Owen loves looking at it and naming them. And opening all the "doors." Next up: learning that a window is not a door ;) "door, door, door, door"
Then I decided it would be fun to have a flannel board. There are tons of tutorials out there so I'm not going to go into depth with this, but I basically duct-taped two pieces of cardboard together, repurposed a receiving blanket by hot-gluing it onto the cardboard, and duct taped the ends onto the back. Easy peasy flannel board. At the time, I didn't have any felt so I cut out shapes to make a house, trees, etc and reinforced them with packing tape. To make them stick, I tore off the velcro tabs on Owen's disposable diapers and taped them onto the back. Oh, and the cotton is snow! I plan on propping this up by the window and comparing what is on the board to what is outside.
So then I saw that I had the rest of this box and was wondering what to do with it. Well I turned it into a house. Fun! I did not spend much time on it because I know it will be destroyed within the next day or two, but I made a roof and cut doors and windows.
From the inside of the house, I drew pictures of what you can see out the window; one of the pictures resembles what our picture window looks like.
From the outside, you can open the tabs and see inside the house.. I used some pictures of Dora and Diego that my husband prints out every once in a while. I just missed taking a picture of Owen trying to shove his head through the door, it was so cute, hopefully he will do it again!
And there you have it, three easy things to do with one cardboard box!

The first was this peekaboo house. I got the idea from this post at I Can Teach My Child. It was fun and easy to make (although if you make it, make sure to put the pictures down before you put on the windows... so hard the other way!)
Inside the windows are pictures of his grandparents and his parents. Owen loves looking at it and naming them. And opening all the "doors." Next up: learning that a window is not a door ;) "door, door, door, door"
Then I decided it would be fun to have a flannel board. There are tons of tutorials out there so I'm not going to go into depth with this, but I basically duct-taped two pieces of cardboard together, repurposed a receiving blanket by hot-gluing it onto the cardboard, and duct taped the ends onto the back. Easy peasy flannel board. At the time, I didn't have any felt so I cut out shapes to make a house, trees, etc and reinforced them with packing tape. To make them stick, I tore off the velcro tabs on Owen's disposable diapers and taped them onto the back. Oh, and the cotton is snow! I plan on propping this up by the window and comparing what is on the board to what is outside.
So then I saw that I had the rest of this box and was wondering what to do with it. Well I turned it into a house. Fun! I did not spend much time on it because I know it will be destroyed within the next day or two, but I made a roof and cut doors and windows.
From the inside of the house, I drew pictures of what you can see out the window; one of the pictures resembles what our picture window looks like.
From the outside, you can open the tabs and see inside the house.. I used some pictures of Dora and Diego that my husband prints out every once in a while. I just missed taking a picture of Owen trying to shove his head through the door, it was so cute, hopefully he will do it again!
And there you have it, three easy things to do with one cardboard box!
Thursday, November 11, 2010
outdoor exploration
we have had an absolutely gorgeous fall day so we decided to take full advantage and go out exploring. First stop, the sandbox! Throwing sand is always fun;

Owen has gotten a lot better at scooping with the shovel as well.

Next I followed the little guy around as he explored the backyard, finally settling on a pile of leaves where the rest of our time would be spent. He threw them, snuggled them, crawled in them, tasted them... great fun.


finally "we" (I) gathered up some outdoor materials to play with inside.

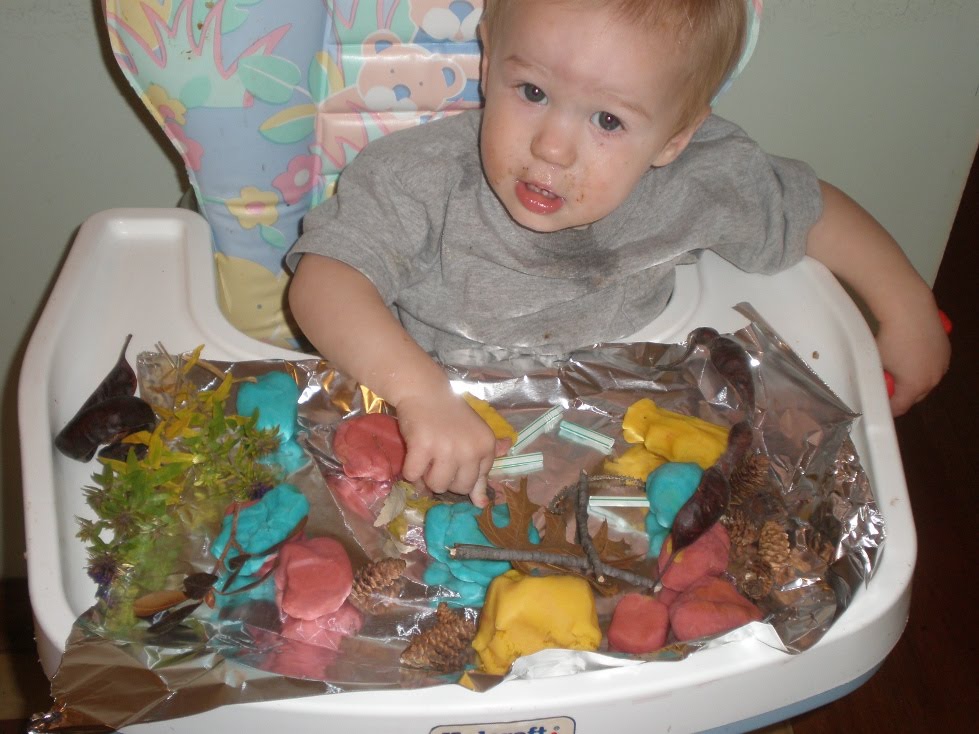
I got out the playdough and added in the outside stuff. I had grand visions of him rolling the pinecones in dough and pressing the leaves in it and things like that, but that just didn't happen ;) It probably would have been enough to just explore the outside stuff on its own without the playdough. Or perhaps it would have been better if I was helping more, but I let him do his own thing while I worked on his daddy's birthday cake.

The playdough, however is awesome, and here is my recipe:
1-cup flour
1/2-cup salt
2-teaspoons cream of tarter
1-cup water
1-Tablespoon cooking oil
food coloring (optional)
Put everything in a pot and cook over medium heat, stirring constantly with a wooden spoon. You're looking for the dough to start separating from the sides of the pan (the time this takes depends on how big your batch is). The smoothest results come from stopping when it still seems like it’ll be a little too sticky. Remove and let cool for a bit on wax paper. Add color and knead to distribute color. Add a scent (e.g., mint, wintergreen, clove, strawberry, etc.) to keep it smelling fresh.
Owen has gotten a lot better at scooping with the shovel as well.
Next I followed the little guy around as he explored the backyard, finally settling on a pile of leaves where the rest of our time would be spent. He threw them, snuggled them, crawled in them, tasted them... great fun.
finally "we" (I) gathered up some outdoor materials to play with inside.
I got out the playdough and added in the outside stuff. I had grand visions of him rolling the pinecones in dough and pressing the leaves in it and things like that, but that just didn't happen ;) It probably would have been enough to just explore the outside stuff on its own without the playdough. Or perhaps it would have been better if I was helping more, but I let him do his own thing while I worked on his daddy's birthday cake.
The playdough, however is awesome, and here is my recipe:
1-cup flour
1/2-cup salt
2-teaspoons cream of tarter
1-cup water
1-Tablespoon cooking oil
food coloring (optional)
Put everything in a pot and cook over medium heat, stirring constantly with a wooden spoon. You're looking for the dough to start separating from the sides of the pan (the time this takes depends on how big your batch is). The smoothest results come from stopping when it still seems like it’ll be a little too sticky. Remove and let cool for a bit on wax paper. Add color and knead to distribute color. Add a scent (e.g., mint, wintergreen, clove, strawberry, etc.) to keep it smelling fresh.
Subscribe to:
Posts (Atom)